JBake v2.6.4 (2018-10-16 17:56) [http://jbake.org]

Usage: jbake ...
Documentation v2.6.5
Table of Contents
1. Installation
1.1. Prerequisites
The only prerequisite for JBake is that you have a Java 8+ Runtime Environment installed and that
the java command is available in your path.
1.2. Binary Distribution
-
Download the main binary distribution and unzip JBake into a folder on your hard disk, this folder will be known as
JBAKE_HOME -
Add a entry for
JBAKE_HOME/binto your path environment variable -
Open a command prompt and run
jbake -h(orjbake.bat -hif you are on Windows) to confirm everything works, you should see usage help text
1.3. SDKMAN
You can also install JBake via SDKMAN (Software Development Kit Manager - formerly known as GVM) if you are running a Bash based platform (Mac OSX, Unix, Linux, Cygwin or Solaris etc.). SDKMAN will take care of downloading the latest distribution, installing it and configuring your environment for you.
After you have SDKMAN installed enter the following command to install the latest version of JBake:
$ sdk install jbake
1.4. Homebrew
You can also install JBake via Homebrew if you are running OS X. After you have installed Homebrew enter the following command to install the latest version of JBake:
$ brew install jbake
2. Quickstart Guide
2.1. Setup
First download JBake and follow the Installation instructions. After that open a command prompt and run the following command to make sure everything is working:
jbake -h
You should then see the following output:
JBake v2.6.4 (2018-10-16 17:56) [http://jbake.org]

Usage: jbake ...
2.2. Create a Project
To get up and running quickly with JBake you can use it’s example project structure along with sample templates as a starting point for you project or site. To do so first you will need to create a new directory and change into it:
$ mkdir project
$ cd project
Then you can use JBake to initialise this directory with it’s example project structure and templates by executing the following command:
$ jbake -i
| This will use Freemarker templates by default, see the Usage section on how to specify the template engine you prefer. |
2.3. Bake
Once you have added some real content to your project and customised your templates you can bake your project by executing the following commands:
$ cd project
$ jbake -b
This will place the baked project into a directory called output in the current directory by default.
|
2.4. Preview
You can then see what your baked project looks like immediately by running JBake in server mode:
$ cd project
$ jbake -s

JBake v2.6.4 (2018-10-16 17:56) [http://jbake.org]

Serving out contents of: [output] on http://localhost:8820/
(To stop server hit CTRL-C)
You can then preview it in your browser at http://localhost:8820.
That’s all there is to it, you can go from nothing to a fully baked site in minutes.
3. Usage
Running jbake without arguments is equivalent to running jbake with -h, and will display the usage instructions.
$ jbake
3.1. Bake command
The bake command mixes your source content with your templates and cooks it all into a fully baked web site. You have a number of different ways to execute the bake command to suite your requirements.
The -b option without any parameters will assume your source content is in the current working directory and will place the baked output into a directory named output
in the current directory:
$ jbake -b
JBake will create this output directory if it does not already exist.
|
If you specify only the source directory as a parameter then the output directory will automatically be generated inside the source directory:
$ jbake -b <source>
You can also specify your source directory and output directory to enable you to have full control over the baking process:
$ jbake -b <source> <output>
You can even omit the -b option if you supply the source directory and output directory parameters:
$ jbake <source> <output>
3.2. Initialisation command
The initialisation command will seed your project directory with the required project structure along with a number of sample content files and templates. You do have the option to choose what template engine is used though.
The -i option will seed the current working directory and use the Freemarker template engine by default:
$ jbake -i
You can also specify the directory to initialise by supplying an additional parameter:
$ jbake -i <directory>
To specify the template engine you can use the -t option along with another parameter:
$ jbake -i -t <freemarker|groovy|groovy-mte|thymeleaf|jade>
| The template engines available are Freemarker, Groovy Simple and Markup, Thymeleaf and Jade. |
3.2.1. Example Project Structures
The example project structure and sample templates are stored in your JBake installation folder in the files:
-
example_project_freemarker.zip -
example_project_groovy.zip -
example_project_groovy-mte.zip -
example_project_thymeleaf.zip -
example_project_jade.zip
If you’d like to change the structure or sample templates in some way then you can extract the contents of these files, update as required, then ZIP them back up and replace the original ZIP file with your updated file. Then JBake will use your updated project structure and templates when ever it initialises a new folder from then on.
3.3. Server command
The server command will allow you to see what your baked site looks like when served out by a HTTP web server, great for when you want to preview your site using your local web browser.
The -s option will start JBake in server mode allowing you to preview your baked site at http://localhost:8820/ by default it will serve out the contents of the
output directory in the current working directory:
$ jbake -s
| The local port used can be changed via the configuration file. |
You can specify the directory to serve out by supplying an additional parameter:
$ jbake -s <directory>
3.3.1. Overriding site.host
The site.host property in your jbake.properties will be automatically be overridden with the following value when using the server command:
site.host=http://localhost:8820
| If you have altered the port from the default it will be reflected in this value too. |
3.3.2. Watch mode
While the server is running JBake will watch the content, assets and templates folders for any changes (new files as well as changes to existing content) and automatically trigger a bake. So you can refresh your browser to see the changes to the output.
This mode is best used in conjunction with incremental rendering, for details on how to enable this please see the Persistent content store configuration option.
3.4. Combining commands
It is possible to combine certain JBake commands together like so:
$ jbake -b -s
This will bake your site first and then serve the output out using the built in server, using the defaults mentioned above.
3.5. Environment Variable
You can use the JBake environment variable JBAKE_OPTS to set JVM system properties such as user.language for when JBake executes:
$ export JBAKE_OPTS="-Duser.language=DE"
3.6. Logging and other libraries
jbake by default will use its logging configuration from its bundled logback.xml file.
To override the bundled logback.xml and have your own logging setup add a ./lib/logging/logback.xml to the directory you launch jbake from.
Likewise any file in ./lib will be added to the classpath which can be used to override or add additional libraries.
5. Project Structure
Here is an example source directory structure for a project:
.
|-- assets
|   |-- favicon.gif
|   |-- robots.txt
|   |-- img
|   |   |-- logo.png
|   |-- js
|   |   |-- custom.js
|   |-- css
|       |-- style.css
|
|-- content
|   |-- about.html
|   |-- 2013
|       |-- 01
|       |   |-- hello-world.html
|       |-- 02
|           |-- weekly-links-1.ad
|           |-- weekly-links-2.md
|
|-- templates
|   |-- index.ftl
|   |-- page.ftl
|   |-- post.ftl
|   |-- feed.ftl
|
|-- jbake.properties
5.1. Assets Directory
The assets directory is where you should place your static files such as images, CSS files and JavaScript files etc. These files are copied over to the baked output as is. You can create any directory structure you like in the assets directory and this structure will be maintained when copied.
5.2. Content Directory
The content directory is where your content files should be placed, these files will be "mixed" with the templates to generate the baked output. Again you can create any directory structure you like for your content, this structure will be maintained when the baked output is created.
The extension of the content file determines what type of content it contains:
| JBake uses flexmark-java to support Markdown format and Asciidoctor to support AsciiDoc format. |
5.2.1. Static files in Content
Any files other than above listed content files, will be treated as static files. When site is baked, all these files will be copied as-is to output folder, while maintaining their directory structure. For example, /content/blog/2013/images/abc.jpg will be copied to to /output/blog/2013/images/abc.jpg.
5.3. Templates Directory
The templates directory is where your templates files go, these files are "mixed" with your content files to generate the baked output. You should place your templates into the root of this directory.
The extension of the template file determines the template engine:
-
.ftl= Freemarker -
.groovy= Groovy’s SimpleTemplateEngine -
.gxml= Groovy’s XmlTemplateEngine -
.thyme= Thymeleaf -
.html= Thymeleaf -
.jade= Jade
It is recommended that you don’t mix different template types, try to stick to just 1 type of templates in your project.
For more information on what you can do in each template engine have a look at the example templates provided with JBake and their respective documentation: Freemarker, Groovy, Thymeleaf & Jade.
5.4. Ignoring Files and Directories
It is possible to ignore certain folders or files in content and assets dirctory to be ignored by JBake.
5.4.1. Ignore Directories
If you add a file named .jbakeignore in a folder then JBake will ignore contents of that folder and all of its sub-folders.
-
If ignored folder is in content, then none of the source files will be rendered/copied by JBake.
-
If ignored folder is in assets, then resources in that folder will not be copied to baked site.
| If you are referring resources from ignored folder in non-ignored source content, then that might result in broken links. |
5.5. Project Configuration
Your project specific configuration is held within the jbake.properties file which should be located in the root directory of the project. This file controls
how your project is baked. See Configuration section for more details.
5.6. Altering Default Structure
You can also alter the default structure by setting some specific configuration options in your jbake.properties file. So you could have the following structure:
.
|-- site
|   |-- assets
|   |   |-- favicon.gif
|   |   |-- robots.txt
|   |   |-- img
|   |   |   |-- logo.png
|   |   |-- js
|   |   |   |-- custom.js
|   |   |-- css
|   |       |-- style.css
|   |-- content
|   |   |-- about.html
|   |   |-- 2013
|   |       |-- 01
|   |       |   |-- hello-world.html
|   |       |-- 02
|   |           |-- weekly-links-1.ad
|   |           |-- weekly-links-2.md
|   |-- templates
|       |-- index.ftl
|       |-- page.ftl
|       |-- post.ftl
|       |-- feed.ftl
|
|-- jbake.properties
By defining the following configuration options:
...
asset.folder=site/assets
content.folder=site/content
template.folder=site/templates
...
You can also use absolute path references for each option too as well as relative path references.
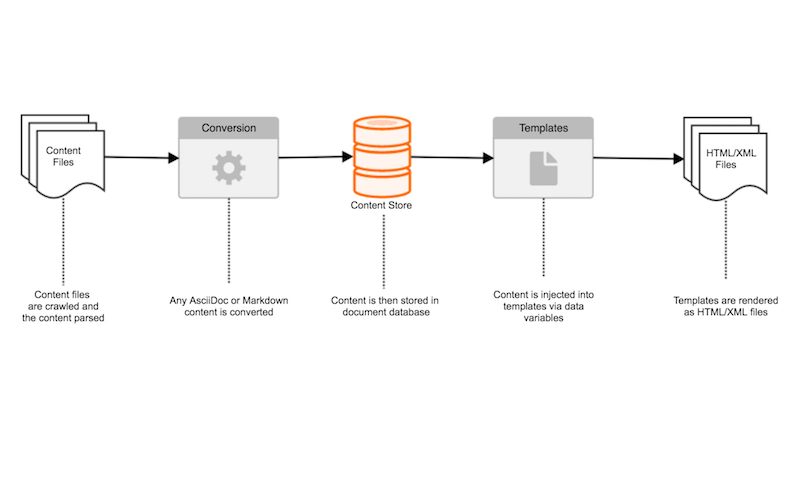
6. Content Files
6.1. Metadata Header
The metadata header defines some basic information that JBake uses when baking the content file.
Each raw HTML or Markdown content file must have a metadata header in it which looks like this:
title=Weekly Links #2
date=2013-02-01
type=post
tags=weekly links, java
status=published
~~~~~~
In the header you must have at least the status & type fields, the rest are optional. The only exception to this rule is if you define a default status in your configuration file.
If you leave the date field out then the files last modified timestamp will be used instead.
For an AsciiDoc formatted content file the metadata header section is optional, the JBake metadata can be defined in the AsciiDoc document header itself like so:
= Project Structure
Jonathan Bullock
2013-10-17
:jbake-type: page
:jbake-tags: documentation, manual
:jbake-status: published
JBake related attributes included in the AsciiDoc header require the jbake- prefix to avoid any collisions.
|
6.1.1. Status
You have 3 options for the status field:
-
draft- drafts are rendered the same as published content however they are given a "-draft" suffix, for examplefirst-post-draft.html, but not included in any published collections -
published- published content is rendered and included in the published collections -
published-date- providing content date is equal to or past current date content will be considered published and included in the published collections
6.1.2. Type
You can choose what template file your content file will be mixed with by changing the value of the type field. By default there are 2 standard types:
-
type=postwill mean the content file will be mixed with the template: post.ftl -
type=pagewill mean the content file will be mixed with the template: page.ftl
You can also define more types in your project configuration to give you more flexibility in your project, for details of this please see Custom Templates.
6.1.3. Custom Metadata
You can also define custom metadata in the header that can be exposed to the templates, for example:
summary=This is a summary of the larger post
And access it in the templates like so:
<p>${content.summary}</p>
6.1.4. Complex Custom Metadata
If you need to define a complex structure of metadata you can use JSON format to achieve this, here’s an example:
type=page
og={"description": "Something"}
| The JSON content must be contained within a single line and cannot span multiple lines. |
This complex data is then accessible from the templates like this:
<#if content?? && content.og??> (1)
	<meta property="og:description" content="${content.og.description}"/> (2)
</#if>
| 1 | Checks the content map is not null and that the content.og map is not null |
| 2 | Outputs the description value from the content.og map |
6.2. Content Body
Everything after the metadata header is considered the content body and made available to the templates, after being converted to HTML if required in the case of Markdown or AsciiDoc.
6.2.1. Images Path
You have the option to update any relative image paths included in your content to absolute image paths. The value specified in the config property site.host is used as the FQDN for the absolute path, unless
you are running server mode locally.
To enable this update of relative image paths set the config property img.path.update to true. You can also control whether the site.host value is used in the absolute path or not by setting img.path.prepend.host to false.
| Any image paths that already absolute will not be altered. |
Assuming the content URI is blog/2017/05/first_post.html and site.host is http://example.com, below are some examples to show how the image paths will be updated -
-
./first.png→http://example.com/blog/2017/05/first.png(whenimg.path.prepend.hostis set totrue) -
./first.png→blog/2017/05/first.png(whenimg.path.prepend.hostis set tofalse) -
/blog/2017/05/first.jpg→http://example.com/blog/2017/05/first.png(whenimg.path.prepend.hostis set totrue) -
/blog/2017/05/first.jpg→/blog/2017/05/first.png(whenimg.path.prepend.hostis set tofalse) -
http://example.com/common/images/second.png→http://example.com/common/images/second.png(Nothing changed as the URL is absolute already.)
7. Templates
7.1. Default Templates
There are default template files defined in JBake that are used to render a number of special pages that require no content files to be present, these are:
-
index- used to render an index.html file -
archive- used to render an archive.html file -
feed- used to render a feed.xml file -
tag- used to render a HTML file for each tag used -
sitemap- used to render a sitemap.xml file
If you don’t require any of these special pages to be rendered then you can turn off the rendering of them by adding the following lines to your
jbake.properties file:
...
render.index=false
render.archive=false
render.feed=false
render.tags=false
render.sitemap=false
...
There are also two default templates files defined in JBake that are used to render content files, these are:
-
page- used to render any content file marked with a type of 'page' -
post- used to render any content file marked with a type of 'post'
7.2. Custom Templates
You also have the ability to define new custom templates that can be used when rendering different types of content files.
First add the following line to your jbake.properties file:
...
template.<customtype>.file=templateXYZ.ftl
...
You are limited to the following characters to define your <customtype>: [A-Za-z0-9-_]
|
Then create your template file and place it into the 'templates' folder inside your project, after that you can create your content files making sure that the metadata header has the following entry:
...
type=<customtype>
...
If you’d like the content files to be rendered with your custom template file using a different extension then add the following to your jbake.properties file:
...
template.<customtype>.extension=.xml
...
8. Data Model
A data model is exposed to each of the templates (regardless of what template engine you use) allowing you to get access to the data parsed from within the content files, the model can also be used to apply logic to the output from the templates.
8.1. Global
These data variables are available to all templates regardless.
-
version= version of JBake being used -
published_date= date baking took place -
[type]s= collection of all content of [type] (e.g. posts = all content of type=post or snippets = all content of type=snippet) -
published_content= collection of all published content (regardless of the type) -
published_posts= collection of just published posts in date descending order -
published_pages= collection of just published pages in date descending order -
all_content= collection of all content (regardless of type) -
alltags= collection of all tags used across all published content -
tags= collection of all tags astagdata model. See Tag Data model. -
content.rootpath= path to root of project (to be used for relative path to assets) -
config.[option]= map of configuration data -
db= alias for direct access to ContentStore class
The db variable provides direct access to the methods of the class which are subject to change without warning!
|
All the configuration options are available with any . in the property being replaced with _.
For example template.index.file=index.ftl is available via config.template_index_file.
In your templates you can loop through any of the collections above in the templates, and access a map of values for each element like so: content.[value]
all of the metadata header fields are available such as content.title along with the body of the content file content.body.
8.1.1. Tag Data model
Global variable tags represent a collection of all tags. Each tag in this collection is represented by a map containing following attributes -
-
name: Name of the tag, as specified in source file. -
uri: Relative path starting Default tag output directory. For example, if tag output directory is defined astagsthen uri for a sample tagjavawould betags/java.html. -
tagged_posts: Represents subset ofpublished_postscollection with posts tagged with this tag. -
tagged_documents: Represents subset ofpublished_contentcollection with documents tagged with this tag.
8.2. Page / Post / Custom
These predefined templates as well as any custom templates you create yourself have the following data available to them:
-
content.[value]= map of file contents
All of the metadata header fields are available such as content.title and the body of the file is available via content.body.
In the map you also have access to:
-
content.file= the full path to the source file -
content.uri= the URI for the baked file
Two navigational metadata fields are available in content. Both of these fields hold a map with three attributes to represent previous/next post/page/custom entry - noExtensionUri, uri and title.
-
content.previousContent -
content.nextContent
For example, uri of next post can be accessed as content.nextContent.uri.
previousContent and nextContent can be null when there is no previous/next content, e.g. on very first entry or last entry. uri and noExtensionUri are relative to the rootPath.
|
8.3. Index
This predefined template has the following extra data variables available to it related to paging:
-
nextFileName= if this variable exists it provides the filename of the next page -
previousFileName= if this variable exists it provides the filename of the previous page -
numberOfPages= if this variable exists it provides the total number of pages (since 2.5.1) -
currentPageNumber= if this variable exists it provides the current number of the page (since 2.5.1)
These variables allow you provide next and previous links in your template to navigate through the pages.
| As indicated, these variables may not exist so you should check first before referring to it. |
8.4. Tags
This predefined template has the following extra data available to it:
-
tag= tag being rendered -
tag_posts= collection of published posts for tag in date descending order -
tagged_documents= collection of published documents (regardless of type) for tag in date descending order
8.4.1. Tags Index
It is possible to generate Index page for the Default tag output directory by setting render.tagsindex to true (default is false) in jbake.properties file.
When enabled, JBake will use the template file defined by template.tagsindex.file to generate tags index. This can be helpful to render a all tags home page, like http://localhost:8820/tags/.
9. Configuration
The jbake.properties file (or legacy file custom.properties) allows you to customise the configuration of JBake for your project.
For example you can change the name of the folder that stores your content or templates, decide whether to generate a
RSS feed or not. The following sections detail the complete list of configuration options available to you. JBake ships
with a default configuration file (default.properties)
that defines the defaults for these options however you can choose to override these by defining options in your jbake.properties file.
So in the absence of these options in your jbake.properties the default value provided by JBake will be used.
You can also comment out any configuration options by adding a hash or number sign as the first character on a line in your file.
9.1. Built in options
9.1.1. Default assets directory
This option defines the folder that holds the assets for your project. This can be a relative path from the root of your project or an absolute path reference.
# folder that contains all asset files
asset.folder=assets
9.1.2. Default content directory
This option defines the folder that holds the content files for your project. This can be a relative path from the root of your project or an absolute path reference.
# folder that contains all content files
content.folder=content
9.1.3. Default output/destination directory
This option defines the name of the directory that will be used for the baked output to be placed in.
# path to destination folder by default
destination.folder=output
9.1.4. Default template directory
This option defines the folder that holds the template files for your project. This can be a relative path from the root of your project or an absolute path reference.
# folder that contains all template files
template.folder=templates
9.1.5. Default index template file
This option defines the default template file that will be used to render the index file
# filename of masterindex template file
template.masterindex.file=index.ftl
In past releases this option was known as: template.index.file
|
9.1.6. Default archive template file
This option defines the default template file that will be used to render an archive file
# filename of archive template file
template.archive.file=archive.ftl
9.1.7. Default feed template file
This option defines the default template file that will be used to render a feed file
# filename of feed template file
template.feed.file=feed.ftl
9.1.8. Default sitemap template file
This option defines the default template file that will be used to render a sitemap file
# filename of sitemap template file
template.sitemap.file=sitemap.ftl
9.1.9. Default tags template file
This option defines the default template file that will be used when rendering a file for each tag
# filename of tag template file
template.tag.file=tags.ftl
9.1.10. Default page template file
This option defines the default template file that will be used when rendering a file of type=page
# filename of page template file
template.page.file=page.ftl
9.1.11. Default post template file
This option defines the default template file that will be used when rendering a file of type=post
# filename of post template file
template.post.file=post.ftl
9.1.12. Default encoding for templates
This option defines the character encoding that should be used when reading in the template files
# character encoding MIME name used in templates.
# use one of http://www.iana.org/assignments/character-sets/character-sets.xhtml
template.encoding=UTF-8
9.1.13. Render index file
This option defines whether an index file should be rendered or not
# render index file?
render.index=true
| This option is useful when you want to use a content file as your index file allowing you to define specific content for the page instead of just using the template. |
9.1.14. Render archive file
This option defines whether an archive file should be rendered or not
# render archive file?
render.archive=true
9.1.15. Render feed file
This option defines whether a feed file should be rendered or not
# render feed file?
render.feed=true
9.1.16. Render sitemap file
This option defines whether a sitemap file should be rendered or not
# render sitemap.xml file?
render.sitemap=false
9.1.17. Render tag files
This option defines whether tag files are rendered or not
# render tag files?
render.tags=true
9.1.18. Default index output filename
This option defines the output filename to be used when rendering the index file
# filename to use for index file
index.file=index.html
9.1.19. Default archive output filename
This option defines the output filename to be used when rendering the archive file
# filename to use for archive file
archive.file=archive.html
9.1.20. Default feed output filename
This option defines the output filename to be used when rendering the feed file
# filename to use for feed
feed.file=feed.xml
9.1.21. Default sitemap output filename
This option defines the output filename to be used when rendering the sitemap file
# filename to use for sitemap file
sitemap.file=sitemap.xml
9.1.22. Default tag output directory
This option defines the output directory to be used when rendering the tag files
# folder name to use for tag files
tag.path=tags
9.1.23. Sanitize tag value
This option defines whether the tag value should be santized before being used as a filename (i.e. replace spaces with hypens)
# sanitize tag value before it is used as filename (i.e. replace spaces with hyphens)
tag.sanitize=false
When this option is set to true it will mean a tag value of west wing will be changed to west-wing, the tag file generated will be west-wing.html.
9.1.24. Default encoding when rendering
This option defines the character encoding that should be used when rendering files
# character encoding MIME name used for rendering.
# use one of http://www.iana.org/assignments/character-sets/character-sets.xhtml
render.encoding=UTF-8
9.1.25. Default output file extension
This option defines the default file extension that should be used when rendering content files
# file extension for output content files
output.extension=.html
9.1.26. Default suffix for draft content
This option defines the default suffix to be used when rendering draft content files
# draft content suffix
draft.suffix=-draft
9.1.27. Default port for server mode
This option defines the default port the server will listen on
# default server port
server.port=8820
9.1.28. Default Freemarker project file
This option defines the filename of the ZIP containing the example project that uses Freemarker templates
# zip file containing example project structure using freemarker templates
example.project.freemarker=example_project_freemarker.zip
9.1.29. Default Groovy SimpleTemplateEngine project file
This option defines the filename of the ZIP containing the example project that uses Groovy SimpleTemplateEngine templates
# zip file containing example project structure using groovy templates
example.project.groovy=example_project_groovy.zip
9.1.30. Default Groovy MarkupTempateEngine project file
This option defines the filename of the ZIP containing the example project that uses Groovy MarkupTemplateEngine templates
# zip file containing example project structure using groovy markup templates
example.project.groovy-mte=example_project_groovy-mte.zip
9.1.31. Default Thymeleaf project file
This option defines the filename of the ZIP containing the example project that uses Thymeleaf templates
# zip file containing example project structure using thymeleaf templates
example.project.thymeleaf=example_project_thymeleaf.zip
9.1.32. Default Asciidoctor attributes
This option defines a set of default Asciidoctor attributes that are used whenever AsciiDoc formatted content is rendered
# default asciidoctor options
asciidoctor.attributes=source-highlighter=prettify
The value for this configuration option is a comma separated list of key-value pairs. The default value defines Prettify as the source highlighter to be used.
9.1.33. Export JBake configuration to Asciidoctor content
This option defines if the JBake configuration options should be exported to Asciidoctor as attributes so they are accessible from within AsciiDoc formatted content.
# should JBake config options be exported to Asciidoctor engine?
asciidoctor.attributes.export=false
| By default this option is disabled in default.properties |
You can also define an additional prefix for the JBake configuration options, this is useful to avoid any collisions with existing AsciiDoc attributes
# prefix that should be used when JBake config options are exported
asciidoctor.attributes.export.prefix=
| By default this option is disabled in default.properties |
9.1.34. Default Content Status
This option defines a default status for content files, allowing you to avoid having to define the status value in each of your content files. This value is ONLY used if a status value hasn’t been defined in the metadata header though.
# default status
#default.status=published
| By default this option is disabled in default.properties |
9.1.35. Default date format for content files
This option defines the default date format that is used when JBake tries to parse the date defined in the metadata header of content files.
The format is specified using pattern letters, details of what is available can be found in the Java API docs.
# default date format used in content files
date.format=yyyy-MM-dd
9.1.36. Markdown extensions
This option defines what Markdown extensions are enabled when content created in the Markdown format is rendered. Each extension required should be separated by a comma. For details on what extensions are available please see the flexmark-java docs.
# comma delimited default markdown extensions
markdown.extensions=HARDWRAPS,AUTOLINKS,FENCED_CODE_BLOCKS,DEFINITIONS
You can use the alias ALL to enable all available extensions. You can also disable specific extensions by prefixing the extension name with a hyphen:
# comma delimited default markdown extensions
markdown.extensions=ALL,-HARDWRAPS
9.1.37. Markdown parsing timeout
| This option is now obsolete as flexmark-java is used. |
This option defines the parsing timeout value in milliseconds for the Pegdown parser that is used for Markdown format support. This value limits the time spent parsing each piece of Markdown content.
# millis to parse single markdown page. See PegDown Parse configuration for details
markdown.maxParsingTimeInMillis=2000
9.1.38. Persistent content store
This option defines whether the content store built while parsing your content files is persisted to disk or not. When it is persisted to disk the next time you perform a bake only those content files that have changed will be rendered speeding up the process. When it is not persisted to disk, i.e. kept in memory, a full bake of all content is performed every time.
# database store (plocal, memory)
db.store=memory
-
plocal = content store is persisted to disk
-
memory = content store is held only in memory during bake
Prior to v2.6.0 the option to persist to disk was local
|
9.1.39. Persistent content store path
This option defines the directory that is used to persist the content store to disk. It is only relevant when the content store is persisted to disk.
# database path
db.path=cache
9.1.40. Thymeleaf Locale
This option defines the locale to be used when rendering Thymeleaf templates.
# thymeleaf locale
thymeleaf.locale=en
9.1.41. Thymeleaf Template Mode
This option defines the Thymeleaf Template Mode to be used when rendering
Thymeleaf templates for the specified type which is set in the content files themselves, e.g. type=page. Defaults to HTML if not set.
# thymeleaf template mode
template_<type>_thymeleaf_mode=HTML
9.1.42. Ignore hidden asset files
This option defines whether hidden asset files should be ignored or not as part of the baking process. When set to true it means files such as .DS_Store or
desktop.ini won’t be included in your baked output.
asset.ignore=false
9.1.43. Enable paging on index page
This option enables paging on the index page output when set to true. To be used in conjunction with the next option.
index.paginate=false
9.1.44. Posts per page
This option defines how many posts will be output on each index page.
index.posts_per_page=10
9.1.45. Enable extensionless URI’s
This option enables extensionless URI’s, so instead of /blog/2014/03/26/post.html JBake will output to /blog/2014/03/26/post/index.html allowing you to refer to the URI without an extension.
uri.noExtension=false
| Requires the following option to be set to define a prefix. |
9.1.46. Enable extensionless URI’s prefix
This option defines the prefix to apply extensionless URI’s for.
uri.noExtension.prefix=/blog/
9.1.47. Default type value for content files
This option allows you to set a default type for content files that’s used when content files don’t explicity set the value.
default.type=page
9.1.48. Image Path Update
This option enables relative image paths to be automatically updated when value is set to true. See Images Path for more information.
img.path.update=true
9.1.49. Image Path Prepend Host
This option enables the use of the site.host value in the construction of the absolute image path to be used. See Images Path for more information.
img.path.prepend.host=true
Needs img.path.update to be set to true otherwise this has no effect.
|
9.2. Custom configuration options
You can also define additional options in your jbake.properties file for use in your project, especially in your template files. A great example is provided in the
sample projects that have an option called site.host which defines the host URL for the site:
site.host=http://jbake.org
This custom option is then used from within the feed template like so:
...
<title><#escape x as x?xml>${post.title}</#escape></title>
<link>${config.site_host}/${post.uri}</link>
<pubDate>${post.date?string("EEE, d MMM yyyy HH:mm:ss Z")}</pubDate>
...
To provide an absolute URI for use in a link.
10. Use as Library
JBake can be used as a library from other software systems allowing you to programmatically bake a site.
10.1. Maven coordinates
The main JBake artifact is available from the Maven Central repository, these are the coordinates:
<dependency>
    <groupId>org.jbake</groupId>
    <artifactId>jbake-core</artifactId>
    <version>2.6.4</version>
</dependency>
The 3rd party libraries that provide support for Markdown content or the Freemarker template engine etc. are defined as optional dependencies in jbake-core so if
you plan on using them you will have to include them as a dependency in your project as well.
For Markdown content support add the following dependency:
<dependency>
    <groupId>com.vladsch.flexmark</groupId>
    <artifactId>flexmark</artifactId>
    <version>0.40.8</version>
</dependency>

<dependency>
    <groupId>com.vladsch.flexmark</groupId>
    <artifactId>flexmark-profile-pegdown</artifactId>
    <version>0.40.8</version>
</dependency>
For AsciiDoc content support add the following dependency:
<dependency>
    <groupId>org.asciidoctor</groupId>
    <artifactId>asciidoctorj</artifactId>
    <version>1.5.8.1</version>
</dependency>
For Freemarker template support add the following dependency:
<dependency>
    <groupId>org.freemarker</groupId>
    <artifactId>freemarker</artifactId>
    <version>2.3.28</version>
</dependency>
For Groovy template support add the following dependencies:
<dependency>
    <groupId>org.codehaus.groovy</groupId>
    <artifactId>groovy-templates</artifactId>
    <version>2.5.5</version>
</dependency>
<dependency>
    <groupId>org.codehaus.groovy</groupId>
    <artifactId>groovy-dateutil</artifactId>
    <version>2.5.5</version>
</dependency>
For Thymeleaf template support add the following dependencies:
<dependency>
    <groupId>org.thymeleaf</groupId>
    <artifactId>thymeleaf</artifactId>
    <version>3.0.11.RELEASE</version>
</dependency>
For Jade template support add the following dependencies:
<dependency>
    <groupId>de.neuland-bfi</groupId>
    <artifactId>jade4j</artifactId>
    <version>1.2.7</version>
</dependency>
10.2. API
The main class you should be focusing on using is Oven, this class provides the main functionality via a .bake() method that requires some parameters to be
passed to it. Here’s an example:
try {
    File source = new File("/path/to/project_source"); (1)
    File destination = new File("/path/to/project_output"); (2)
    Oven oven = new Oven(source, destination, true); (3)
    oven.setupPaths(); (4)
    oven.bake(); (5)
} catch (ConfigurationException e) { (6)
    // do something with exception here
} catch (JBakeException e) { (7)
    // do something with exception here
}| 1 | Defines the project source, this should be the root directory of the project, JBake will look in this directory for jbake.properties |
| 2 | Defines where the baked output should be placed |
| 3 | The third parameter defines if the local cache (persistent content store) should be cleared and therefore trigger a full bake |
| 4 | This method checks the paths supplied exist and content the required elements |
| 5 | This method performs the actual baking |
| 6 | A ConfigurationException is thrown if there is an issue loading the project configuration from jbake.properties |
| 7 | If any exceptions are thrown during the path checks or baking process they are wrapped in a JBakeException |
10.3. Logging
All output is generated using LogBack apart from certain elements of the command line interface. You can control the output by making sure there is a logback.xml on the classpath. The binary distribution includes a pre-defined logback.xml that is a good reference point.
11. Build Tool Integration
11.1. Maven Plugin
There is a Maven plugin that allows you to run JBake from your Maven build.
The plugin is available from the Maven Central repository using the following coordinates:
<dependency>
    <groupId>org.jbake</groupId>
    <artifactId>jbake-maven-plugin</artifactId>
    <version>0.3.2</version>
</dependency>
The plugin was originally created by Aldrin Leal.
11.2. Gradle Plugin
There is a Gradle plugin that allows you to run JBake from your Gradle build.
The plugin was originally created by Cédric Champeau.
11.3. mill Plugin
There is a mill plugin that integrates site generation with JBake into mill.
The plugin was developed and is maintained by Tobias Roeser.
11.4. sbt Plugin
There is a sbt plugin that integrates site generation with JBake into sbt.
The plugin was developed and is maintained by Tobias Roeser.
11.5. SBuild Plugin
There is a SBuild plugin that allows you to run JBake from your SBuild build.
The plugin is available from the Maven Central repository using the following coordinates:
<dependency>
    <groupId>org.sbuild</groupId>
    <artifactId>org.sbuild.plugins.jbake</artifactId>
    <version>0.1.2</version>
</dependency>
The plugin was developed by Tobias Roeser.